| How To Setup The RetroArch PS2 Core PCSX2 (LRPS2) | 您所在的位置:网站首页 › retroarch PS2内核 › How To Setup The RetroArch PS2 Core PCSX2 (LRPS2) |
How To Setup The RetroArch PS2 Core PCSX2 (LRPS2)
|
If you’re looking for how to set up the RetroArch PS2 core PCSX2, otherwise known as LRPS2, you’ve found the right article. We’ll be breaking down the process of how you can get up and running to play your favorite PlayStation 2 games in RetroArch in no time. If you’ve tried downloading the RetroArch PS2 core but found that your games didn’t work, don’t worry, this is a common occurrence. It turns out that setting up PS2 emulation in RetroArch can be a bit trickier than some of the other consoles and systems available. We recently wrote about how to set up PCSX2 cheats on the emulator, but today we’ll be covering the RetroArch PS2 core. While the RetroArch PS2 core does show as available to download and install, the truth is that there are some extra steps necessary to get it set up and running as well. You may have also realized that in RetroArch, the PS2 core that’s shown as available isn’t named PCSX2, but rather shows as LRPS2. Don’t worry, the PCSX2 emulator has simply been renamed in RetroArch to LRPS2 so this is expected. Without further ado, let’s jump in and break down how to set things up correctly. Contents hide 1. How To Setup The RetroArch PS2 Core PCSX2 (LRPS2)? 1.1. Download RetroArch 1.2. Get your PS2 ROM ready 1.3. Using a controller? 1.4. 1. Download The Necessary PCSX2 Files 1.5. 2. Downloading the PS2 BIOS File Needed 1.5.1. 3. Finding the PS2 Core PCSX2 (LRPS2) 1.5.2. Downloading the LRPS2 Core 1.6. 2. How To Load Your PS2 ROM File In RetroArch 1.6.1. Go to Load Content 2. Additional PS2 Core Settings, Options, and Features 2.1. Graphics Upscaling and Improving Visuals 2.2. Supported PS2 Core File Extensions How To Setup The RetroArch PS2 Core PCSX2 (LRPS2)? Download RetroArch You’ll first need to go ahead and download and install the RetroArch emulator which you can grab from the official website here. If you already have RetroArch installed, make sure you are on the latest stable version which you can get here.Get your PS2 ROM ready Ensure that you first have at least one PS2 ROM file that you’ll be using to test after getting setup. This ROM is the PS2 game that you’ll be playing and using to test to make sure everything is setup properly.Remember that downloading PS2 ROM files for games you don’t own and haven’t dumped yourself is illegal. Using a controller? A USB or Bluetooth controller is recommended when playing your PS2 games. That being said, while a controller is a much better for playing retro games than a keyboard, you can play however you wish.If you’re in the market for a capable new controller, an 8Bitdo SN30 Pro Wireless Bluetooth controller is a great choice and will only run you about $45 on Amazon. 1. Download The Necessary PCSX2 FilesBefore we can begin setting up the RetroArch PS2 core, we’ll first need to make sure we have the needed PCSX2 emulator files. The PS2 core will use some of the assets that the PCSX2 emulator uses as well. For more information on the PCSX2 emulator, check out our guide on the best PS2 emulators. We’ll simply be copying the required files over to the RetroArch folder on our computer to allow the RetroArch PS2 core to work as intended. First things first, head over to the PCSX2 website and download the Portable version of the emulator from their downloads page here: https://pcsx2.net/downloads/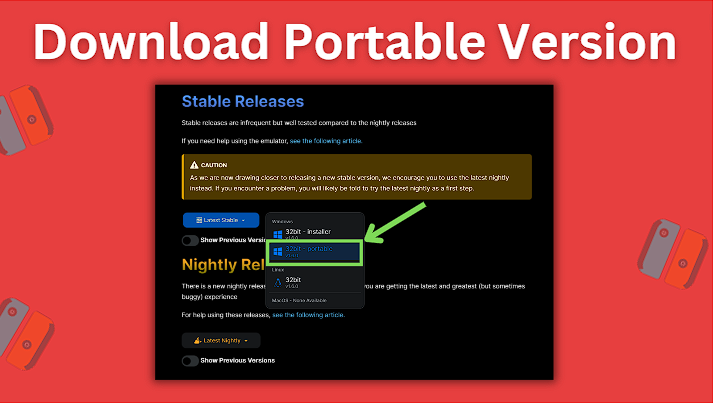 Download the portable version of the PCSX2 emulator.After downloading the Portable version of the emulator, go ahead and extract PCSX2 from the archive onto your desktop or somewhere easy to findNow create a new folder named pcsx2 in your RetroArch system folder within the RetroArch emulator’s folder on your computerAfter creating the newly extracted Folder within your RetroArch directory, open up the folder of the portable version of the PCSX2 emulator that you downloaded and extractedDouble click to start the PCSX2 emulator application and begin the process of completing the emulator’s setupSome additional folders will be automatically created in the PCSX2 emulator’s installation directory when you do thisNow go ahead and select every file in the PCSX2 directory and copy them all over to the RetroArch/system/pcsx2/ folder within RetroArch that you previously created Download the portable version of the PCSX2 emulator.After downloading the Portable version of the emulator, go ahead and extract PCSX2 from the archive onto your desktop or somewhere easy to findNow create a new folder named pcsx2 in your RetroArch system folder within the RetroArch emulator’s folder on your computerAfter creating the newly extracted Folder within your RetroArch directory, open up the folder of the portable version of the PCSX2 emulator that you downloaded and extractedDouble click to start the PCSX2 emulator application and begin the process of completing the emulator’s setupSome additional folders will be automatically created in the PCSX2 emulator’s installation directory when you do thisNow go ahead and select every file in the PCSX2 directory and copy them all over to the RetroArch/system/pcsx2/ folder within RetroArch that you previously created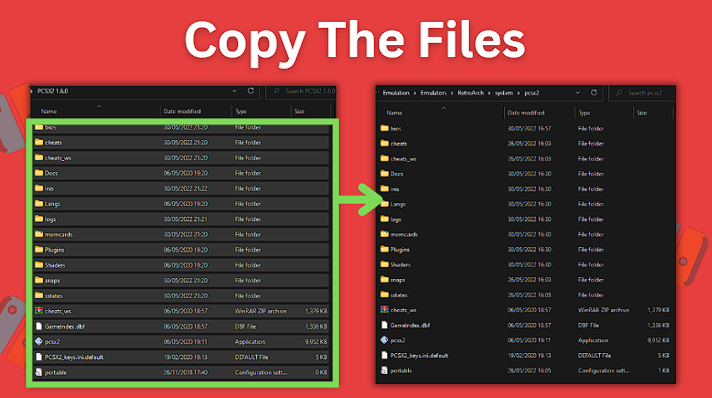 Copy the file from the PCSX2 standalone Portable emulator’s folder to the RetroArch/system/pcsx2 folder in RetroArch.2. Downloading the PS2 BIOS File Needed Copy the file from the PCSX2 standalone Portable emulator’s folder to the RetroArch/system/pcsx2 folder in RetroArch.2. Downloading the PS2 BIOS File Needed
In order for RetroArch to properly run its PS2 core, we also need to first setup a PS2 BIOS file. If you don’t yet have the needed BIOS file, you can easily find the BIOS file by doing a simple Google search for it using the keywords PS2 SPCH BIOS fileOne of the first results should be for the Internet Archive and you should be able to find and download the BIOS file you needKeep in mind that the BIOS file that you need to download and use will depend on the region for the games that you want to play, so for example if you want to play USA based PS2 games, you’ll need to download and use the USA BIOS fileGo ahead and download the .bin file of the region’s BIOS you needWhen you have your PS2 BIOS file downloaded and ready, copy it into the RetroArch/system/pcsx2/bios/ folder3. Finding the PS2 Core PCSX2 (LRPS2) Once RetroArch opens, select Load Core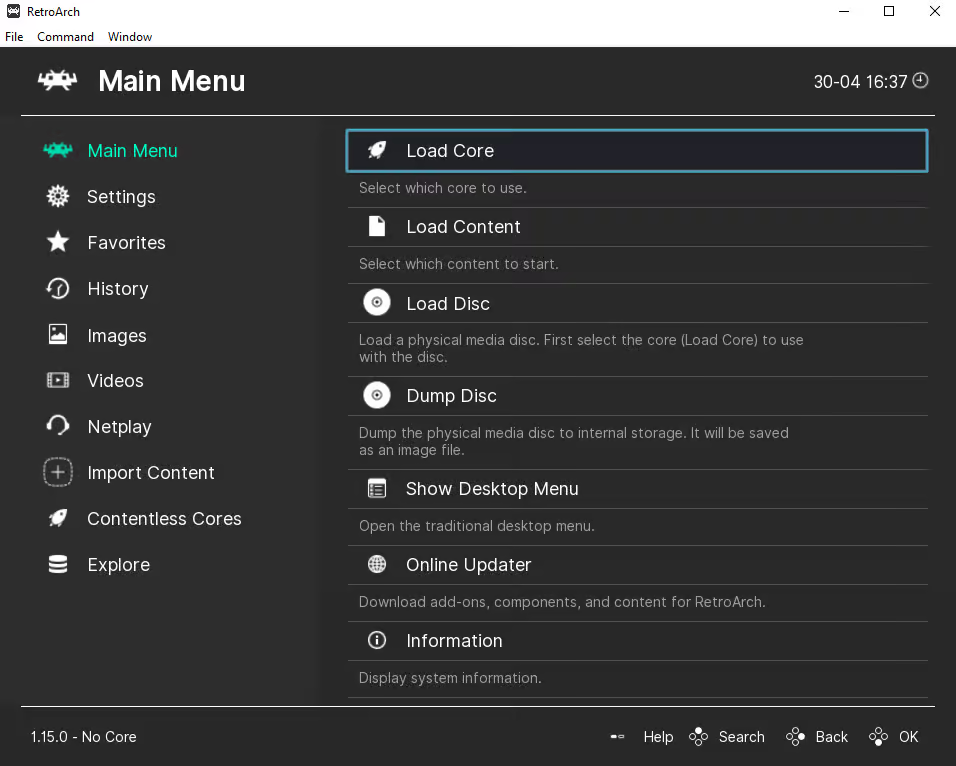 Select the Load Core option in RetroArchNext, choose Download a Core Select the Load Core option in RetroArchNext, choose Download a Core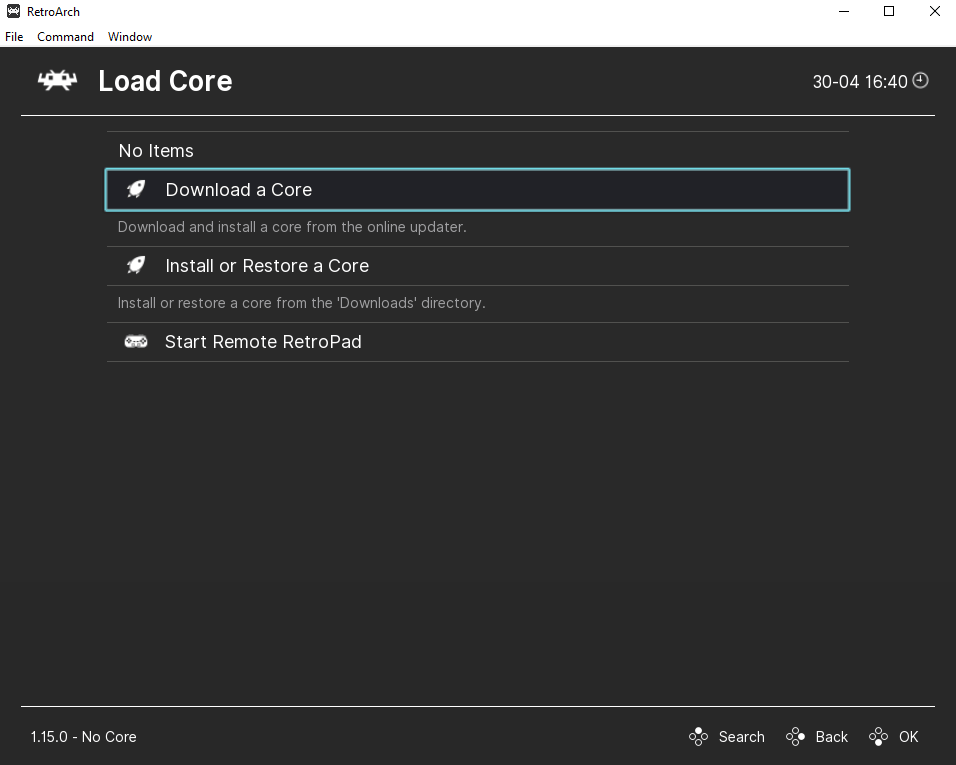 Select to Download a CoreDownloading the LRPS2 Core
Remember, above we mentioned that RetroArch renamed their PS2 core as LRPS2, but it is essentially the same as the PCSX2Scroll all the way down until you see the Sony – PlayStation 2 (LRPS2) core and select it to download it Select to Download a CoreDownloading the LRPS2 Core
Remember, above we mentioned that RetroArch renamed their PS2 core as LRPS2, but it is essentially the same as the PCSX2Scroll all the way down until you see the Sony – PlayStation 2 (LRPS2) core and select it to download it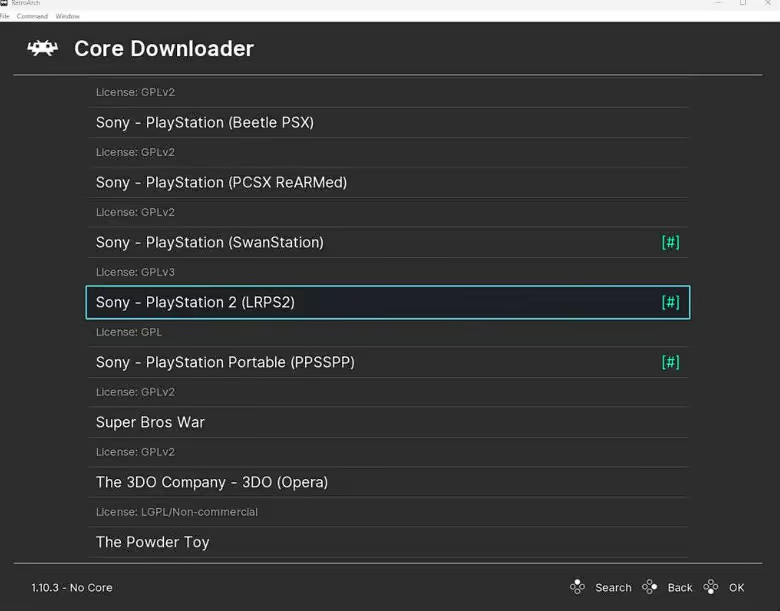 Download the Sony – PlayStation 2 (LRPS2) core.If RetroArch was already installed on your device, it’s a good idea to go back to the main menu screen and scroll down to select Online Updater and then select Update Core Info Files and also select Update Databases to ensure that all of your cores info files and databases are all up to date Download the Sony – PlayStation 2 (LRPS2) core.If RetroArch was already installed on your device, it’s a good idea to go back to the main menu screen and scroll down to select Online Updater and then select Update Core Info Files and also select Update Databases to ensure that all of your cores info files and databases are all up to date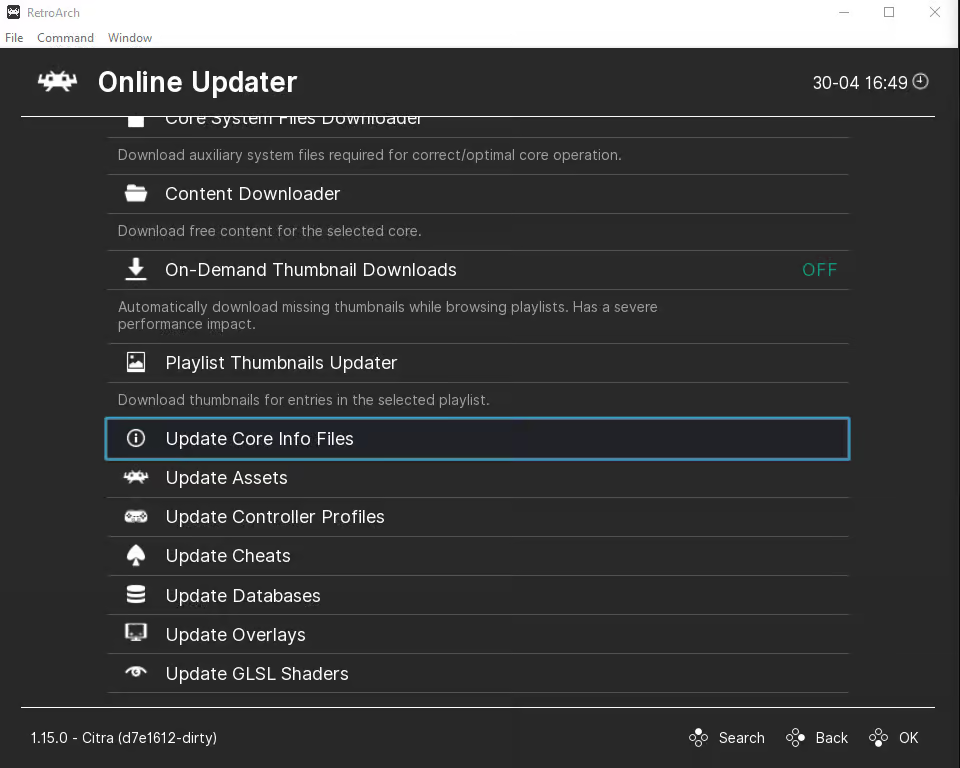 Update Core Info FilesAfter it’s done downloading, you may now press back and then select Load Core2. How To Load Your PS2 ROM File In RetroArch
Go to Load Content Update Core Info FilesAfter it’s done downloading, you may now press back and then select Load Core2. How To Load Your PS2 ROM File In RetroArch
Go to Load Content
With the PS2 core now all setup and installed in RetroArch, we’re ready to load up our PS2 ROM file(s). Head back to the main menu and select Load Content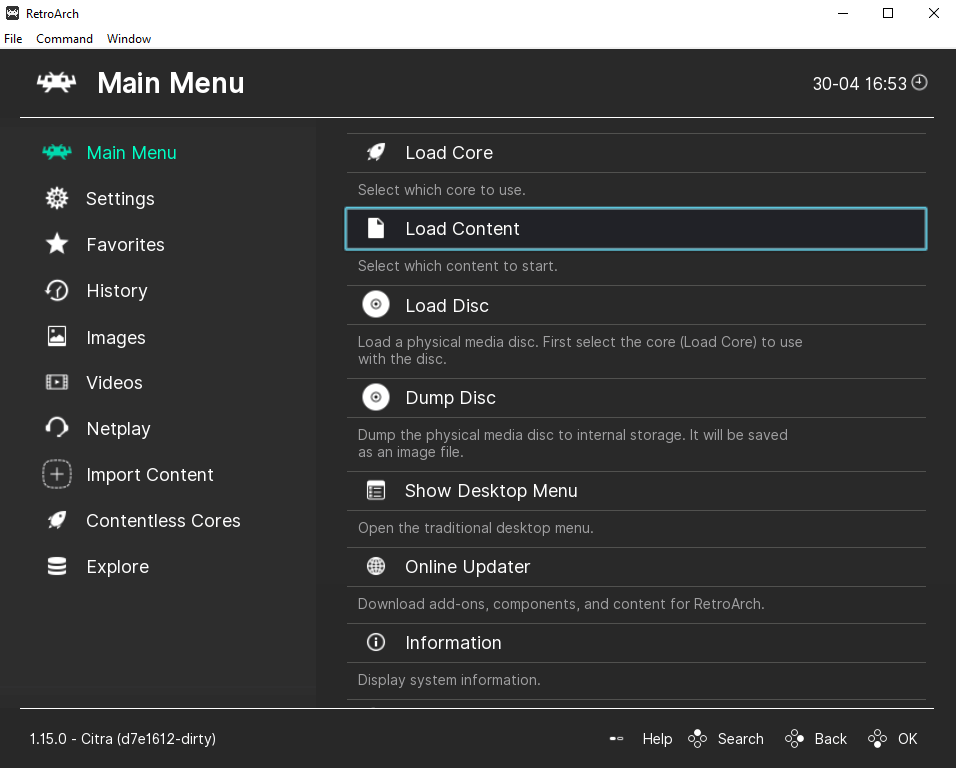 Locate where you saved your PS2 ROM on your computer and select itYour PS2 game should now launch and voila, just like that you’re all set and ready to playIf your BIOS file asks you to set the console region and time, just select whichever settings you prefer and you should be all setAdditional PS2 Core Settings, Options, and Features
Graphics Upscaling and Improving Visuals Locate where you saved your PS2 ROM on your computer and select itYour PS2 game should now launch and voila, just like that you’re all set and ready to playIf your BIOS file asks you to set the console region and time, just select whichever settings you prefer and you should be all setAdditional PS2 Core Settings, Options, and Features
Graphics Upscaling and Improving Visuals
This is a completely optional additional step that isn’t necessary, but if you have a setup with a powerful graphics card, why not give it a shot? You can potentially upscale your PS2 games up to 5k if you want. Just go ahead and open up a PS2 game in RetroArch and once the game launches, press the F1 key (or button assigned to the menu if you have it changed)With the menu now open, head to Options > Video and you will be presented with all the video options for the emulatorYou’ll next want to choose Internal Resolution and then select the resolution that you want the game to to output for your monitor or displayIf you find that the first isn’t the right choice, tinker a bit and see what looks the best while still maintaining your desired level of performanceSupported PS2 Core File ExtensionsThe PPSSPP core supports the following file extensions: .elf.iso.ciso.chd.cso.bin.mdf.nrg.dump.gz.img.m3uAlso, be sure to check out our PCSX2 controller setup guide here for playing with an external controller. This article may contain affiliate links. If you use these links to purchase an item, we may earn a commission. Thank you for your support! |
【本文地址】